
개발하고 싶은 초심자
230226 D+3 호출 시그니쳐(Call Signatures), 오버로딩(overloading), 다형성(polymorphism) 본문
230226 D+3 호출 시그니쳐(Call Signatures), 오버로딩(overloading), 다형성(polymorphism)
정새얀 2023. 2. 26. 18:021. call signatures
: 파라미터와 와 반환(return)값의 타입을 모두 type으로 미리 선언하는 것.
이전에 함수를 작성할 때는 아래와 같은 방식으로 타입을 항상 작성했었다.
function multiply(a, b) {
  return a * b; // arguments인 a와 b의 타입을 체크해주지 않았기 때문에 코드가 동작하지 않음
}

function multiply(a: number, b: number) { // function multiply(a: number, b: number): number
  return a * b;
}

const multiply = (a: number, b: number) => a * b;
하지만 이번에는 타입을 작성해주지 않고, 아래 코드와 같이 특정 함수에서의 타입을 만들고 싶다.
type Profile = {
  name: string,
  age?: number
}
사진과 같은 부분을 call signature라고 하는데, 이는 사용자가 함수를 어떻게 호출해야 하는지, 함수의 반환타입이 무엇인지 알려준다.
⇒ arguments의 타입과 함수의 반환 타입을 알려준다.
⇒ React에서 함수로 props를 보낼 때, 어떻게 작동할지 미리 설계할 수 있다.
type Multiply = (a: number, b: number) => number;

// multiply의 타입은 Multiply, Multiply의 타입이 무엇인지 타입스크립트가 알고 있음
// arg(a, b)의 타입을 굳이 명시해줄 필요가 없다
const multiply: Multiply = (a, b) => a * b;
console.log(multiply(2, 3)); // 6

// 동작하지 않음
// Type 'void' is not assignable to type 'number'.
// 'void' 형식은 'number' 형식에 할당할 수 없습니다.
const multiply: Multiply = (a, b) => { a * b };
{}를 사용하면 그 값이 반환값이 함수 내부의 내용으로 처리가 된다.
const multiply: Multiply = (a, b) => a * b;를 함수로 풀면
function multiply(a, b) {
  return (a * b);
}

const multiply: Multiply = (a, b) => { a * b };를 함수로 풀면
function multiply(a, b) {
  a * b;
}
화살표 함수에서 {}를 사용하게 되면 그 안의 값은 반환이 아니라 함수 내부 내용으로 처리되기때문에 반환값이 없는 void로 처리된다. 이에 따라 위에서 미리 선언한 Multiply 자료형의 반환값은 number로 정해놓은 내용과 충돌하여 에러가 발생한다.
2. overloading
: 동일한 이름에 매개 변수와 매개 변수 타입 또는 리턴 타입이 다른 여러 버전의 함수를 만드는 것.
⇒ 여러 call signatures가 있는 함수.
Function(=Method) Overloading은 직접 작성하기보다 외부 라이브러리에 자주 보이는 형태로, 하나의 함수가 복수의 Call Signature를 가질 때 발생한다.
TS에서는 오버로드 signatures을 작성하여 다양한 방식으로 호출할 수 있는 함수를 지정할 수 있다.
⇒ 파라미터만 달라지고, 비슷한 로직이 반복되는 경우에 사용할 수 있다.
call signature는
type Multiply = {
  (a: number, b: number): number
  (a: number, b: number): number
}

const multiply: Multiply = (a, b) => a * b;
상기 코드처럼 작성할 수 있는데, 오버로딩은 함수가 서로 다른 여러 개의 call signatures를 가지고 있을 때 발생시킨다.
type Multiply = {
  (a: number, b: number): number // ① 이러한 형태로도 가능하고
  (a: number, b: string): number // ② 이러한 형태로도 가능하기 때문에
};

// ③ a의 타입은 number이지만 b의 타입이 string|number 이기 때문에 작동하지 않음
const multiply: Multiply = (a, b) => a * b;
type Multiply = {
(a: number, b: number): number;
(a: number, b: string): number;
};
const multiply: Multiply = (a, b) => {
if (typeof b === "string") return a; // (a: number, b: string): number;의 조건을 충족함
return a * b; // if 조건문 이외의 조건을 충족시키는 코드. a * b;의 값을 리턴함.
};상기 코드는 아주 소수의 함수에서만 볼 수 있는 예시이기 때문에, 의미있는 예시는 아니지만 오버로딩의 핵심을 보여준다.
// 다른 call signatures에 파라미터의 개수가 다른 경우
// Multiply를 호출할 때 a와 b를 부를 수도 있고, a, b, c를 부를 수도 있음
// 파라미터 c는 기본적으로 옵션임을 나타냄
type Multiply = {
  (a: number, b: number): number,
  (a: number, b: number, c: number): number
};

const multiply: Multiply = (a, b, c) => {
  return a * b;
}; // 동작하지 않음

const multiply: Multiply = (a, b, c?: number) => { // 추가 파라미터인 c의 타입을 지정해줄 것
  if(c) return a * b * c; // c가 있는 경우에 리턴할 값을 지정해줌
  return a * b;
};
// Next.js에서의 예시
// 페이지를 이동할 때
// 문자열로 "/main"을 push하면 /main 페이지로 이동할 수 있음
Router.push("/main");
// 문자열뿐만 아니라 객체 형태로도 보내줄 수 있음
Router.push({
path: "/main",
state: 1,
});type Config = {
path: string,
state: object,
};
type Push = {
(path: string): void // 이러한 형태로도 보내줄 수 있고
(config: Config): void // 이러한 형태로도 보내줄 수 있음
};
const push: Push = (config) => {
if(typeof config === 'string') { console.log(config); }
else { console.log(config.path) }; // console.log(config.state);
}
config의 타입이 string|Config일 때,

TS는 config의 타입이 무엇인지 체크할 수 있게 해준다.
만약 config의 타입을 string으로 해주었을 때, config의 타입은 string으로 나온다.


config의 타입이 string이 아닌 경우에는 path와 state 값을 가질 수 있는 Config 타입의 객체라는 것을 TS는 알 수 있다.
3. polymorphism
: 여러 타입을 받아들임으로써 여러 형태를 가지는 것.
// 배열을 받고 타입에 상관없이 배열의 요소를 하나씩 print해주는 함수
type SuperPrint = {
  (arr: number[]): void;
  (arr: boolean[]): void;
};

const superPrint: SuperPrint = (arr) => {
  arr.forEach(e => console.log(e));
};

superPrint([1, 2, 3, 4]);
superPrint([true, false, true, true]);
superPrint(["a", "b", "c", "d"]); // 동작하지 않음
type SuperPrint = {
(arr: number[]): void
(arr: boolean[]): void
(arr: string[]): void
};
const superPrint: SuperPrint = (arr) => {
arr.forEach(e => console.log(e));
};
superPrint([1, 2, 3, 4]);
superPrint([true, false, true, true]);
superPrint(["a", "b", "c", "d"]);
superPrint([1, 2, true, false]); // 이러한 arguments에 대한 call signature가 없기 때문에 동작하지 않음만약 문자열로 이루어진 배열도 동작할 수 있게 하려면 어떻게 할 수 있을까?
물론 상기 코드처럼 SuperPrint안에 string[]으로 이루어진 배열 타입을 작성할 수도 있겠지만, 매번 이렇게 해줘야한다면 불편할 것 같다.
어떤 타입의 요소가 들어가있더라도 동작하게 만들려면?
✷ concrete type
: 구체적인 타입을 의미하는데, 구체적인 타입은 실제로 사용되는 값의 형태와 일치한다.
ex) number, boolean, string, void, unknown
✷ generic type
: 타입의 placeholder(Something that will be replaced).
concrete type을 사용하는 것 대신 쓸 수 있음.
✅ Why we use generic?
call signature를 작성할 때, concrete type을 알 수 없을 때 사용한다.
✅ How to use generic?
// 여러 타입의 배열을 가지는 함수 만들기
type SuperPrint = {
  // <>안에 들어갈 단어는 무엇이 들어가도 상관없다.
  // <>를 작성함으로서 제네릭 타입을 사용한다는 것을 알려주어야함(이 부분은 필수)
  <Generic>(arr: Generic[]): void
};

const superPrint: SuperPrint = (arr) => {
  arr.forEach(e => console.log(e));
};

// generic을 사용하게 되면 TS는 각각의 값들을 보고 타입을 유추하여 기본적으로 그 유추한 타입으로 call signature를 보여준다.
// 즉, Generic 대신 TS가 유추한 타입으로 바꿔주는 것.
superPrint([1, 2, 3, 4]);
superPrint([true, false, true, true]);
superPrint(["a", "b", "c", "d"]);
superPrint([1, 2, true, false]);
placeholder 대신 TS가 유추한 타입인 number|boolean을 보여주는 것을 알 수 있다.

중간에 string타입의 요소를 넣게 되더라도, TS가 유추하여 보여준다.
type SuperPrint = {
  <Generic>(arr: Generic[]): void
};

const superPrint: SuperPrint = (arr) => arr[0];

console.log(superPrint([1, 2, 3, 4])); // 1

// const a: boolean
const a = superPrint([true, false, true, true]);
console.log(a); // true

// const b: string|number|boolean
const b = superPrint(["hello world", 1, 2, true, false]);
console.log(b); // hello world
4. Generics Recap
type SuperPrint = <T>(a: T[]) => T;

const superPrint: SuperPrint = (a) => a[0];

const a = superPrint([1, 2, 3, 4]);
const b = superPrint([true, false, true, true]);
const c = superPrint(["a", "b", "c", "d"]);
const d = superPrint(["hello world", 1, 2, true, false]);

a.toUpperCase(); // 동작하지 않음
type SuperPrint = <T, V>(a: T[], b: V) => T;
const superPrint: SuperPrint = (a) => a[0];
const a = superPrint([1, 2, 3, 4], "typescript");
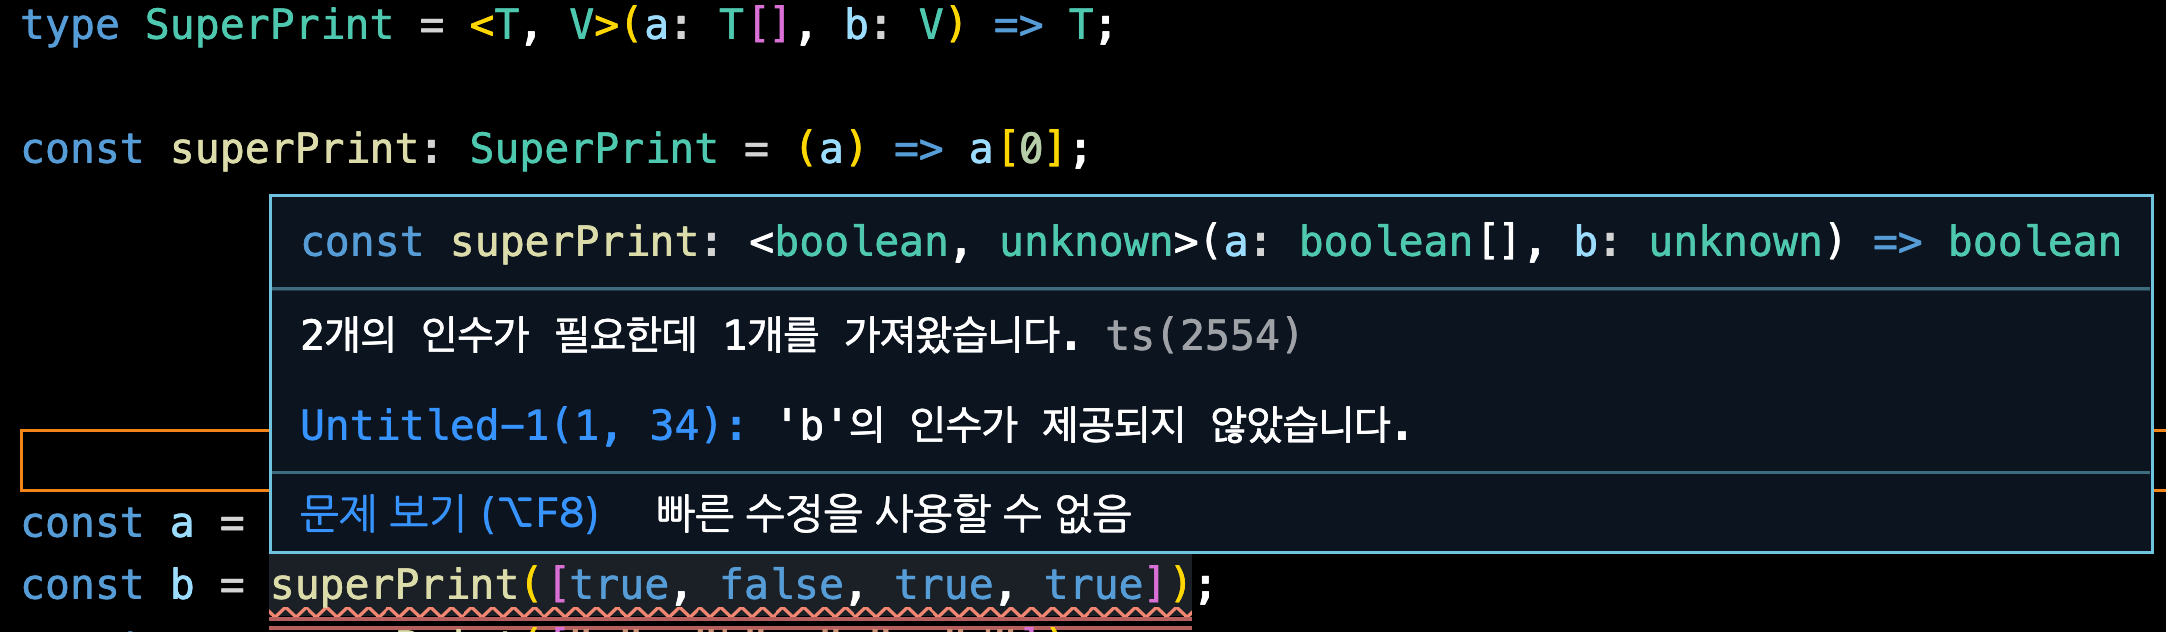
TS는 제네릭을 처음 인식했을 때와 제네릭의 순서를 기반으로 제네릭의 타입을 알게된다.
따라서, 제네릭의 이름을 먼저 지정해주고 그 이름에 따른 파라미터의 타입을 지정해주면 된다.


✅ 제네릭은 선언 시점이 아니라 생성 시점에 타입을 명시하여 하나의 타입만이 아닌 다양한 타입을 사용할 수 있도록 하는 기법이다.
5. How to use Generics in real world
type SuperPrint = <T>(a: T[]) => T;
const superPrint: SuperPrint = (a) => a[0];

const a = superPrint([1, 2, 3, 4]);
const b = superPrint([true, false, true, true]);
const c = superPrint(["a", "b", "c", "d"]);
const d =superPrint(["hello world", 1, 2, true, false]);

// 두 줄의 코드를 함수 형태로 바꾸어 썼을 때
// type SuperPrint = <T>(a: T[]) => T;
// const superPrint: SuperPrint = (a) => a[0];
function superPrint(<T>(a: T[]) {
  return a[0];
};
제네릭을 사용하여 타입을 생성할 수도 있고, 어떤 경우에는 타입을 확장할 수도 있으며, 코드를 저장하기도 한다.
type Profile<I> = {
  name: string,
  info: I
};

const kimcoding: Profile<{mbti: string}> = {
  name: "kimcoding",
  info: {
    mbti: "ISTJ"
  }
};

or

type Profile<I> = {
  name: string,
  info: I
};

type KimcodingProfile = Profile<{mbti: string}>;

const kimcoding: KimcodingProfile = {
  name: "kimcoding",
  info: {
    mbti: "ISTJ"
  }
};

or

type Profile<I> = {
  name: string,
  info: I
};

type KimcodingMbti = { mbti: string };
type KimcodingProfile = Profile<KimcodingMbti>;

const kimcoding: KimcodingProfile = {
  name: "kimcoding",
  info: {
    mbti: "ISTJ"
  }
};
type Profile<I> = {
name: string,
info: I
};
const parkhackerProfile: Profile<null> = {
name: "parkhacker",
info: null
}
// 타입들끼리 상속도 가능하다
// Generic은 원하는만큼 커스텀 및 재사용 가능
type A = Array<number>;
const a: A = [1, 2, 3, 4];
type A = Array<number>;
const a: A = [1, 2, 3, 4];
function printNumbers(a: A) {
return a;
}
console.log(a); // [1, 2, 3, 4]
function b(e: Array<number>) {
return e;
}
let e = [1, 2, 3, 4];
console.log(e); // [1, 2, 3, 4]함수 뿐만 아니라 다양한 경우의 제네릭을 활용할 수 있는데, TS의 대부분의 타입들(ex. Array의 기본 형태)이나 useState가 제네릭으로 디자인되어 있다.
// React.js
// useState()를 사용할 때, 제네릭을 보면 useState의 call signature가 number 타입의 useState가 된다.
useState<number>()
'기술개념정리(in Typescript)' 카테고리의 다른 글
| 230227 D+4 OOP(Object Oriented Programming/객체 지향 프로그래밍) in Typescript (0) | 2023.02.27 |
|---|---|
| 230226 D+3 타입스크립트의 타입들(3) (0) | 2023.02.26 |
| 230221 D+2 타입스크립트의 타입들(2) (0) | 2023.02.21 |
| 230221 D+2 타입스크립트의 타입들(1) (0) | 2023.02.21 |
| 232220 D+1 타입스크립트의 개념과 타입 시스템 (0) | 2023.02.20 |

